These Apple Hand Pies are ready in about 45 minutes, they’re a crowd pleaser and ooze with a fantastic homemade apple pie filling with every bite.

I really love handheld desserts. These Apple Hand Pie are one of my favorite Fall recipes, especially since we always have a nice overabundance of apples.
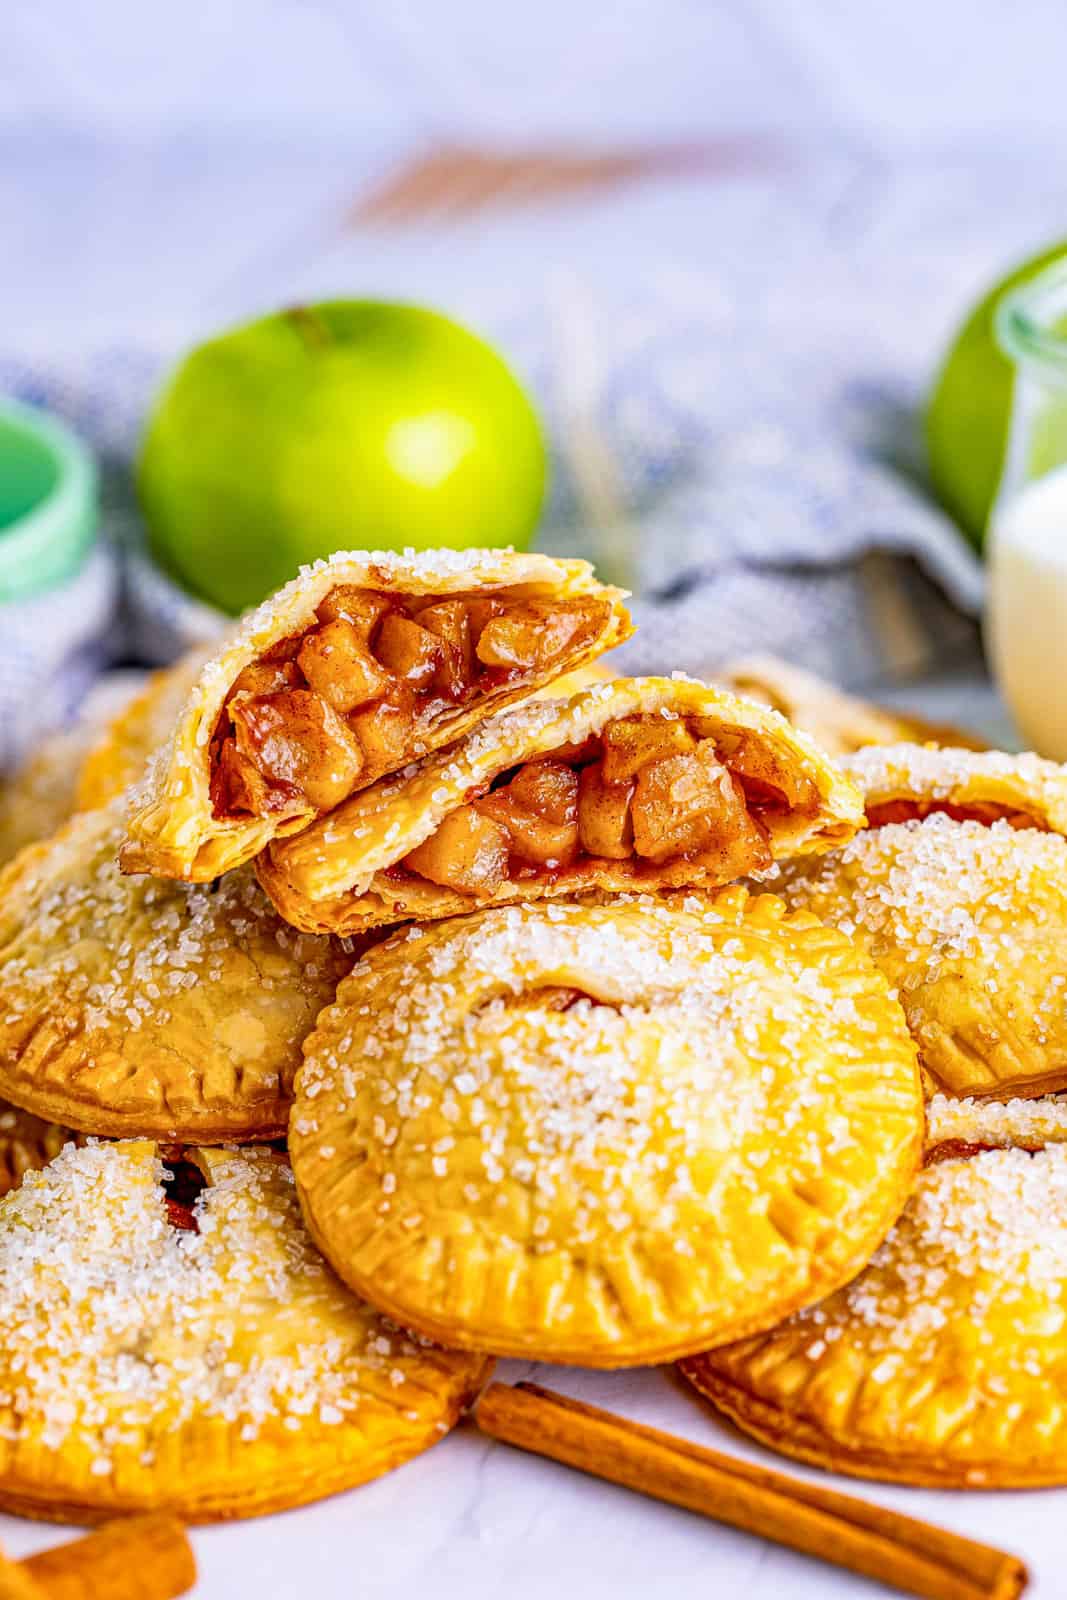
This recipe makes the cutest handheld little apple pies! They remind me of the Little Debbie pie treats I used to eat during my childhood.
Except these have a crunchy crystalized sugar on the outside that really sets them off and then the warm cinnamon interior is like fall in a bite.
It’s like having a hot apple pie right out of the oven but the perfect handheld size and just the right amount for a tasty dessert.
I’ve been making hand pies for a while along with other single serving desserts and this one has always been a family favorite and always requested during apple season.
They are great for a grab and go breakfast, snack or dessert. Just something you can munch on and really be satisfied, but won’t overwhelm you with how big it is.
Some of our other favorite dessert recipes we have on our site include: Cherry Hand Pies, Apple Pie, and Homemade Strawberry Pop-Tarts.

WHY THIS RECIPE WORKS:
- Easy to customize and use any filling, homemade or canned.
- Tastes like your own handheld slice of apple pie.
- Faster to make than whole apple pies.
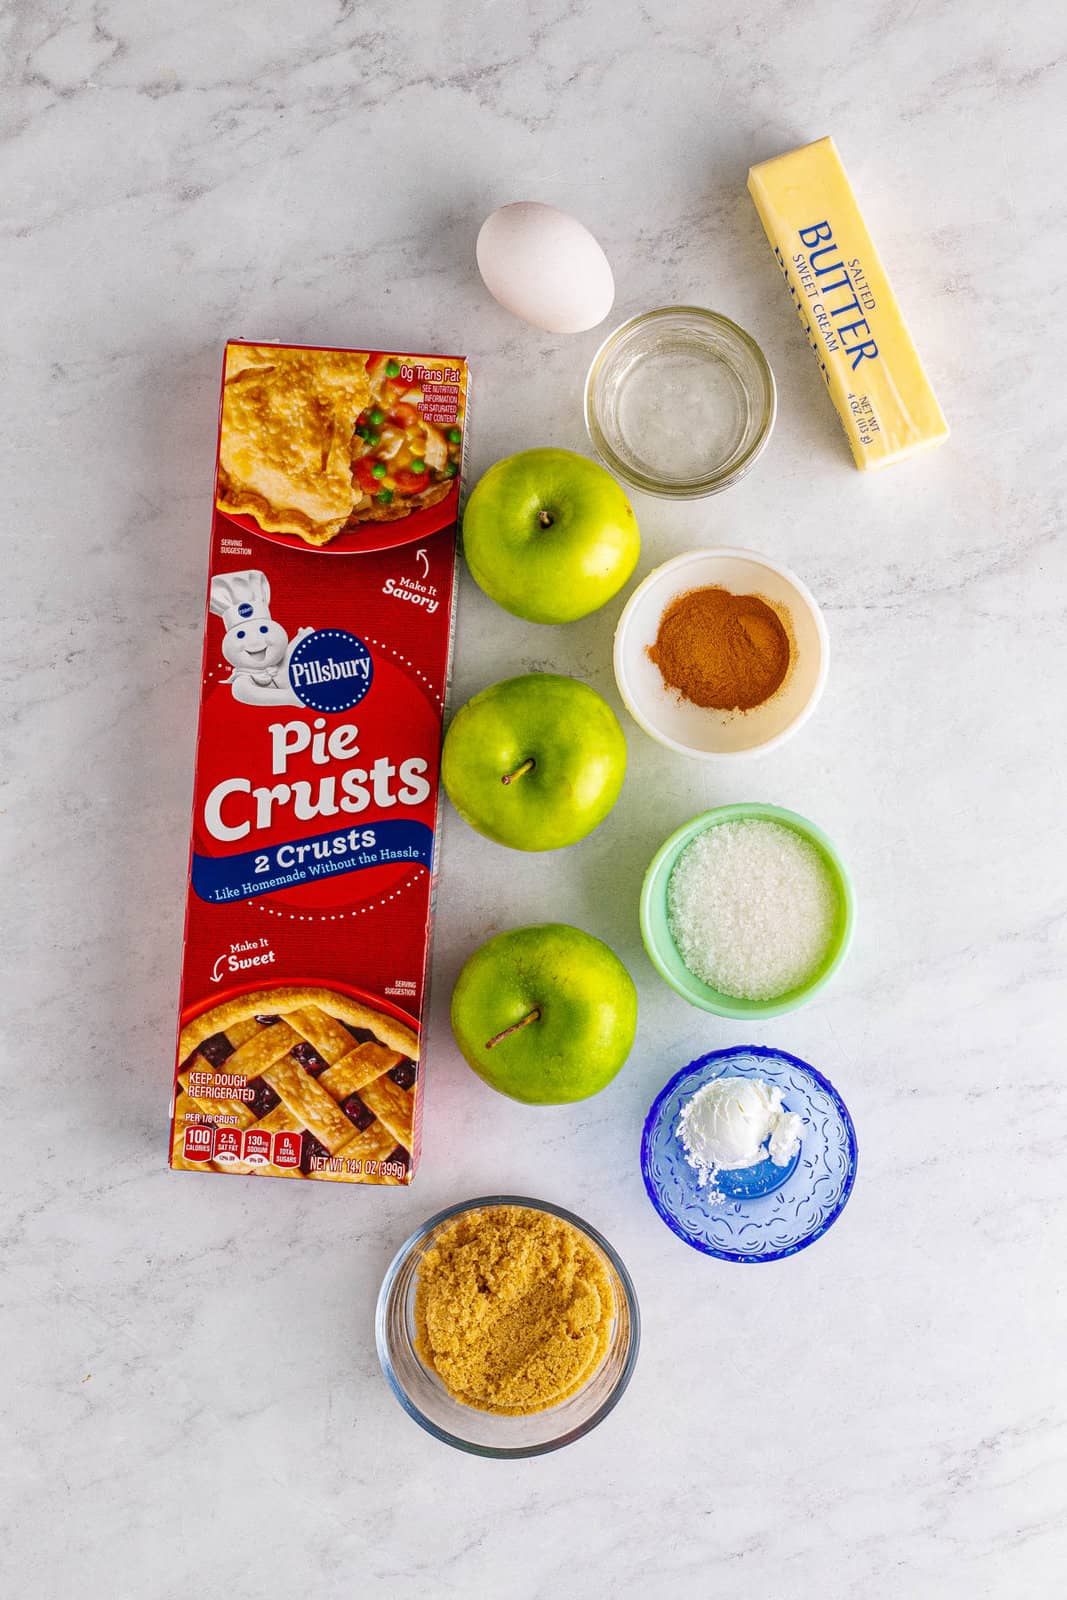
INGREDIENTS NEEDED (FULL RECIPE AT BOTTOM)
Salted butter
Light brown sugar
Ground cinnamon
Apples
Water
Cornstarch
Pie crusts
Egg
Decorators sugar
HOW TO MAKE APPLE HAND PIES, STEP BY STEP:
- Preheat the oven to 375°F and line two baking sheet trays with parchment paper before setting them aside.
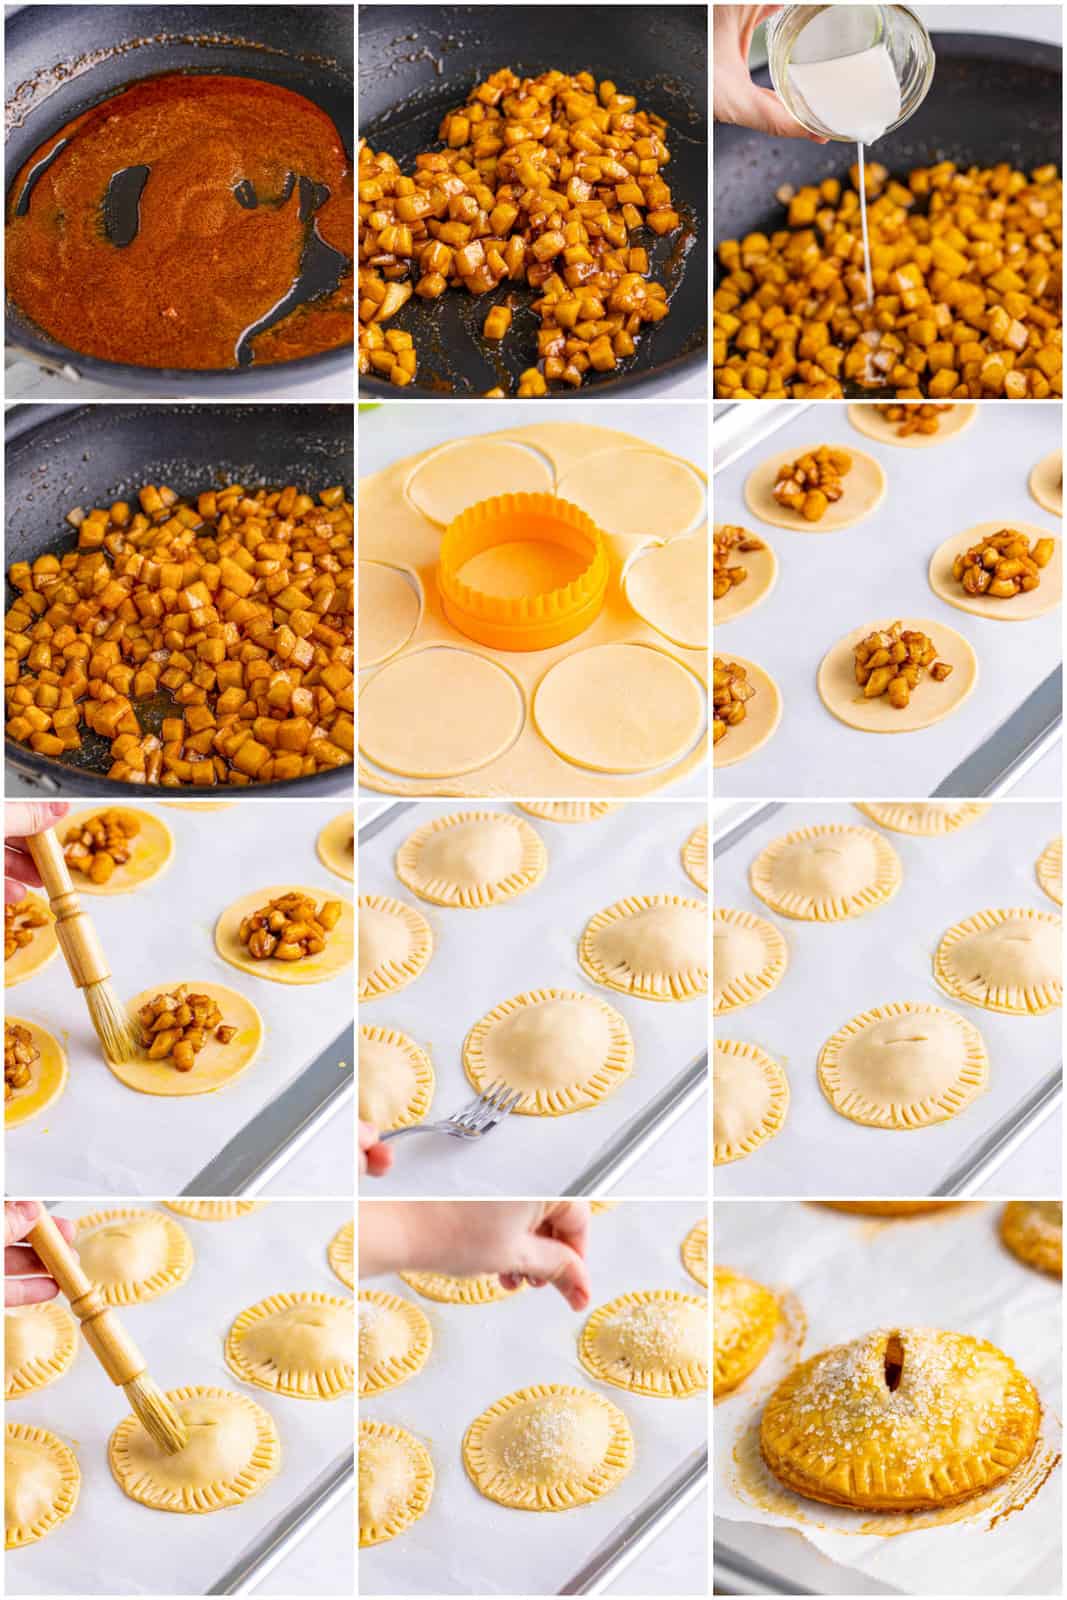
- Over medium-low heat add the butter, brown sugar, and cinnamon in a large skillet. Stirring it constantly and the butter melts and the sugar dissolves.
- Add in the diced apples to the large skillet and coat the pieces in the butter and sugar mixture. Bring it all to a simmer for 5-8 minutes, or until the apples are tender yet still slightly crisp, stirring occasionally.
- In a small bowl, whisk together the water and cornstarch while the apples are simmering. Once the apples are tender-crisp, pour in the cornstarch slurry while continuing to stir continuously.
- Cook for an additional minute, while stirring constantly until the mixture is thick and then remove it from the heat.
- Unroll a thawed pie crust and cut out 7 circles using a 3 & ½ inch round cookie cutter. Place the circles onto one of the lined sheet trays. Be sure they aren’t touching. Cut out 7 circles from a second thawed pie crust and set them aside.
- Add about 2 tablespoons of the pie filling to the center of each of the pie crusts on the lined sheet tray.
- Beat together the egg and water in a small bowl and then brush the egg wash along the outer edge of the pie crust.
- Put another pie crust on top of each of the circles you added the filling and egg wash to. Use a fork to seal the edges of the pie crusts together to form the hand pie.
- Cut one slit into the top of each pie to use as a venting hole.
- Brush the entire top of the pies with the egg wash and then sprinkle with the decorator’s sugar.
- Bake the handheld pies for 20-23 minutes, or until they’re golden brown. Repeat with the rest of the ingredients.
- When they’re finished baking, remove them from the oven and let them cool for 10 minutes on the sheet tray before moving them to a wire rack to finish cooling completely. Serve warm or at room temperature and enjoy.
CAN YOU USE A DIFFERENT SIZE COOKIE CUTTER?
Yes, you can use a different one. However, I think this size is the perfect dessert size for an individual person. If you change the size you may need to change the baking time.
You may also not have as many servings, or have enough filling to make more if you increase the size of the pies. Keep these things in mind if you decide to change up the cookie cutter size.
WHAT CAN I SERVE THESE HAND PIES WITH?
These Apple desserts are perfect just by themselves. You can also serve them with a scoop of ice cream, like vanilla ice cream, or with a drizzle of caramel sauce or even chocolate sauce to really jazz them up.
CAN I CHANGE UP THE FILLING?
That’s one of the things I love about baked desserts like this one, you can play with different ideas. The filling is an easy one to change up any time you make a new batch.
We love using just cinnamon but you can add some nutmeg, allspice, ground ginger, or any other spices you add to your apple pie desserts.
You can also change the filling flavors, while we make our own homemade filling for this recipe, you can use canned filling as well, so cherry, blueberry, chocolate, etc will all work.

HOW TO STORE:
These can be stored in an airtight container at room temperature where they will keep for up to 2 days. If you wish to extend this, you can store them in the refrigerator for up to 5 days.
They can also be frozen, place them in a freezer container or bag and they will keep for up to 3 months.
To defrost, remove from freezer to the countertop or refrigerator, If you wiso to warm up, place in the microwave and warm until just heated through.
TIPS AND TRICKS:
- Try drizzling on some caramel sauce on top. I know it can feel sticky and not as appealing when eating these desserts with your hand, but it reallllly adds even more of a tasty touch.
- When dicing your apples, make sure to dice them small enough that the filling will not be too bulky and you can’t properly seal the pie crusts together without too much struggle.
- Feel free to freeze leftovers, see my suggestions above.
- One of the great things about desserts are you can change up the filling easily, see my other ideas above.
- You can use a homemade pie crust or your favorite store-bought refrigerated pie crust. Whatever you prefer.
- Serve these pies with another accompanying dessert for even more deliciousness.
- These can easily be doubled.
On the hunt for a sweet, but not too sweet dessert that is perfect for the fall season? This Apple Hand Pie Recipe is just what you need. Much easier and faster to make than a homemade Apple Pie too, but still tastes just as delicious!
if you like this recipe you might also like:
If you’ve tried these APPLE HAND PIES or any other recipe on my site, let me know in the comment section how it turned out, we love hearing from our readers! You can also follow along with me on PINTEREST, FACEBOOK and INSTAGRAM to see more amazing recipes and what shenanigans I’m getting into!

Apple Hand Pies
Ingredients
For the apples:
- 2 tablespoons salted butter
- ¼ cup light brown sugar packed
- 1 ½ teaspoon ground cinnamon
- 3 medium Granny Smith apples peeled, cored, small diced
- 2 teaspoons water
- 1 ½ teaspoons cornstarch
For assembly:
- 4 refrigerated pie crusts thawed
- 1 large egg
- Splash of water
- 1 tablespoon decorators sugar
Instructions
- Preheat the oven to 375°F and line two baking sheet trays with parchment paper before setting them aside.
- Over medium-low heat add the butter, brown sugar, and cinnamon in a large skillet. Stirring it constantly and the butter melts and the sugar dissolves.
- Add in the diced apples to the large skillet and coat the pieces in the butter and sugar mixture. Bring it all to a simmer for 5-8 minutes, or until the apples are tender yet still slightly crisp, stirring occasionally.
- In a small bowl, whisk together the water and cornstarch while the apples are simmering. Once the apples are tender-crisp, pour in the cornstarch slurry while continuing to stir continuously.
- Cook for an additional minute, while stirring constantly until the mixture is thick and then remove it from the heat.
- Unroll a thawed pie crust and cut out 7 circles using a 3 & ½ inch round cookie cutter. Place the circles onto one of the lined sheet trays. Be sure they aren't touching. Cut out 7 circles from a second thawed pie crust and set them aside.
- Add about 2 tablespoons of the pie filling to the center of each of the pie crusts on the lined sheet tray.
- Beat together the egg and water in a small bowl and then brush the egg wash along the outer edge of the pie crust.
- Put another pie crust on top of each of the circles you added the filling and egg wash to. Use a fork to seal the edges of the pie crusts together to form the hand pie.
- Cut one slit into the top of each pie to use as a venting hole.
- Brush the entire top of the pies with the egg wash and then sprinkle with the decorator's sugar.
- Bake the handheld pies for 20-23 minutes, or until they're golden brown. Repeat with the rest of the ingredients.
- When they're finished baking, remove them from the oven and let them cool for 10 minutes on the sheet tray before moving them to a wire rack to finish cooling completely. Serve warm or at room temperature and enjoy.
Notes
- Try drizzling on some caramel sauce on top. I know it can feel sticky and not as appealing when eating these desserts with your hand, but it reallllly adds even more of a tasty touch.
- When dicing your apples, make sure to dice them small enough that the filling will not be too bulky and you can’t properly seal the pie crusts together without too much struggle.
- Feel free to freeze leftovers, see my suggestions above.
- One of the great things about desserts are you can change up the filling easily, see my other ideas above.
- You can use a homemade pie crust or your favorite store-bought refrigerated pie crust. Whatever you prefer.
- Serve these pies with another accompanying dessert for even more deliciousness.
- These can easily be doubled.
Nutrition
Tornadough Alli is not a nutritionist or dietitian, and any nutritional information shared is an estimate. If calorie count and nutritional value is important to you, we recommend running the ingredients through whichever online nutritional calculator you prefer. Calories and values can vary depending on which brands were used.
Leave a Reply