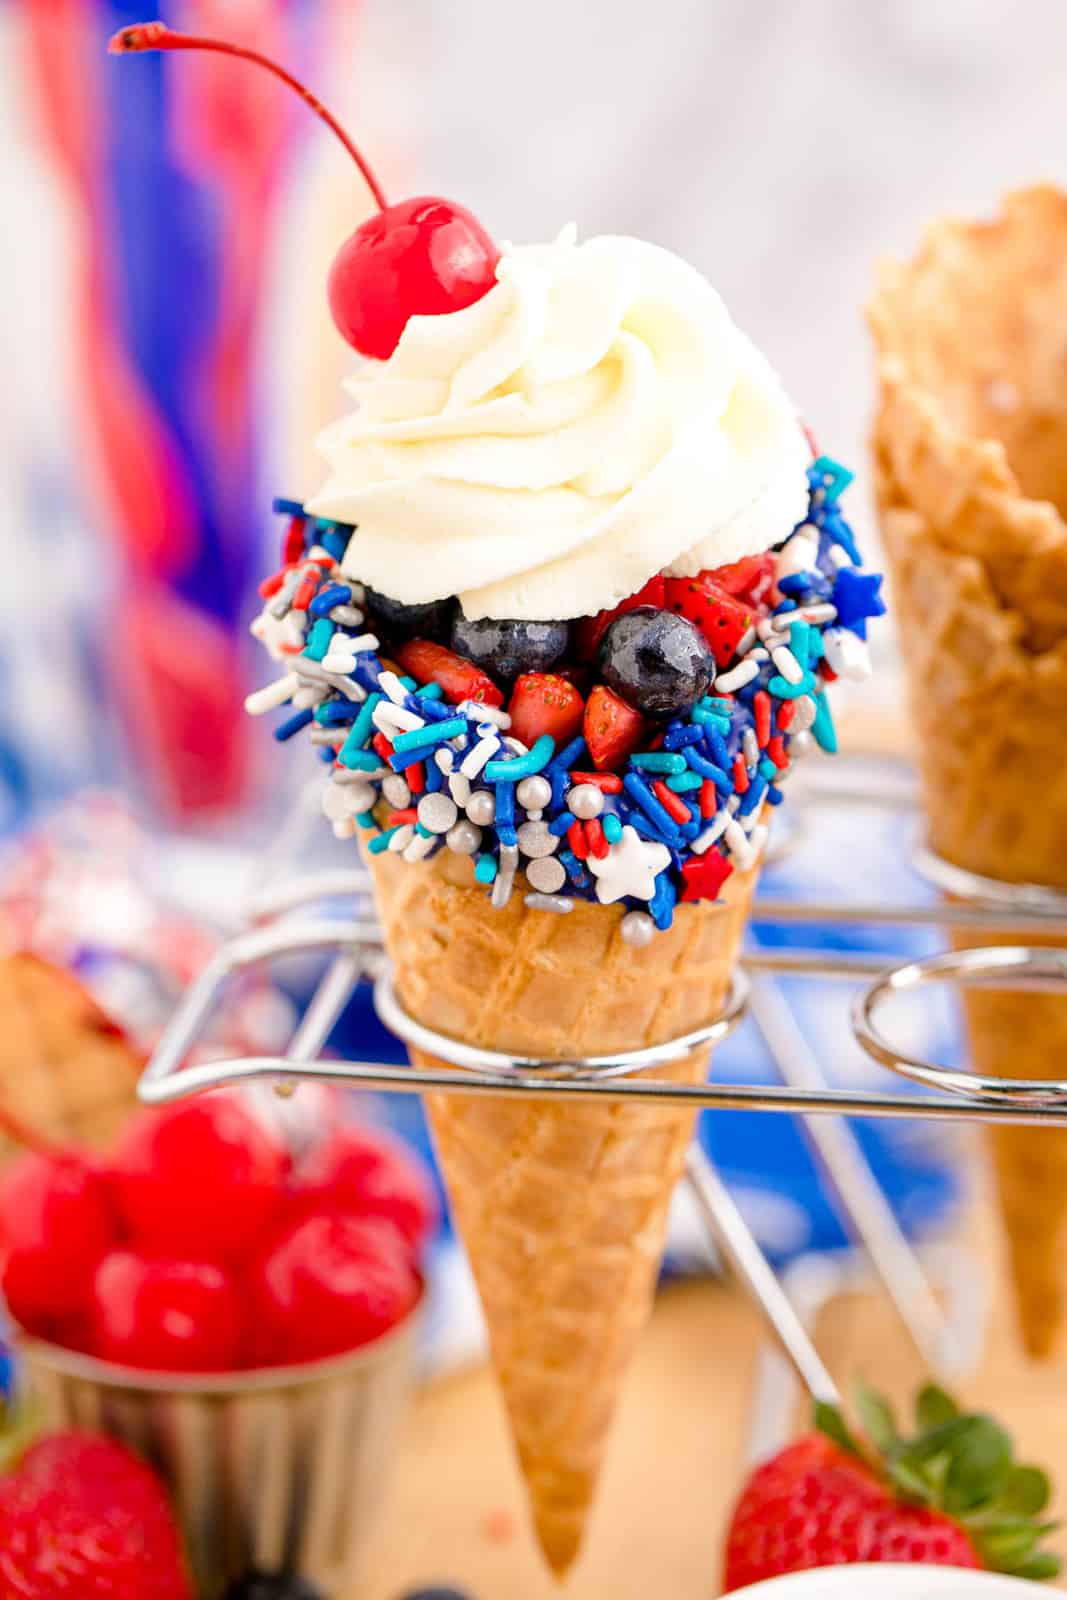
Fruit Cones are a simple treat made from waffle cones and filled with fruit, flavored whipped cream and melted chocolate with sprinkles. A super fun and kid-friendly treat!
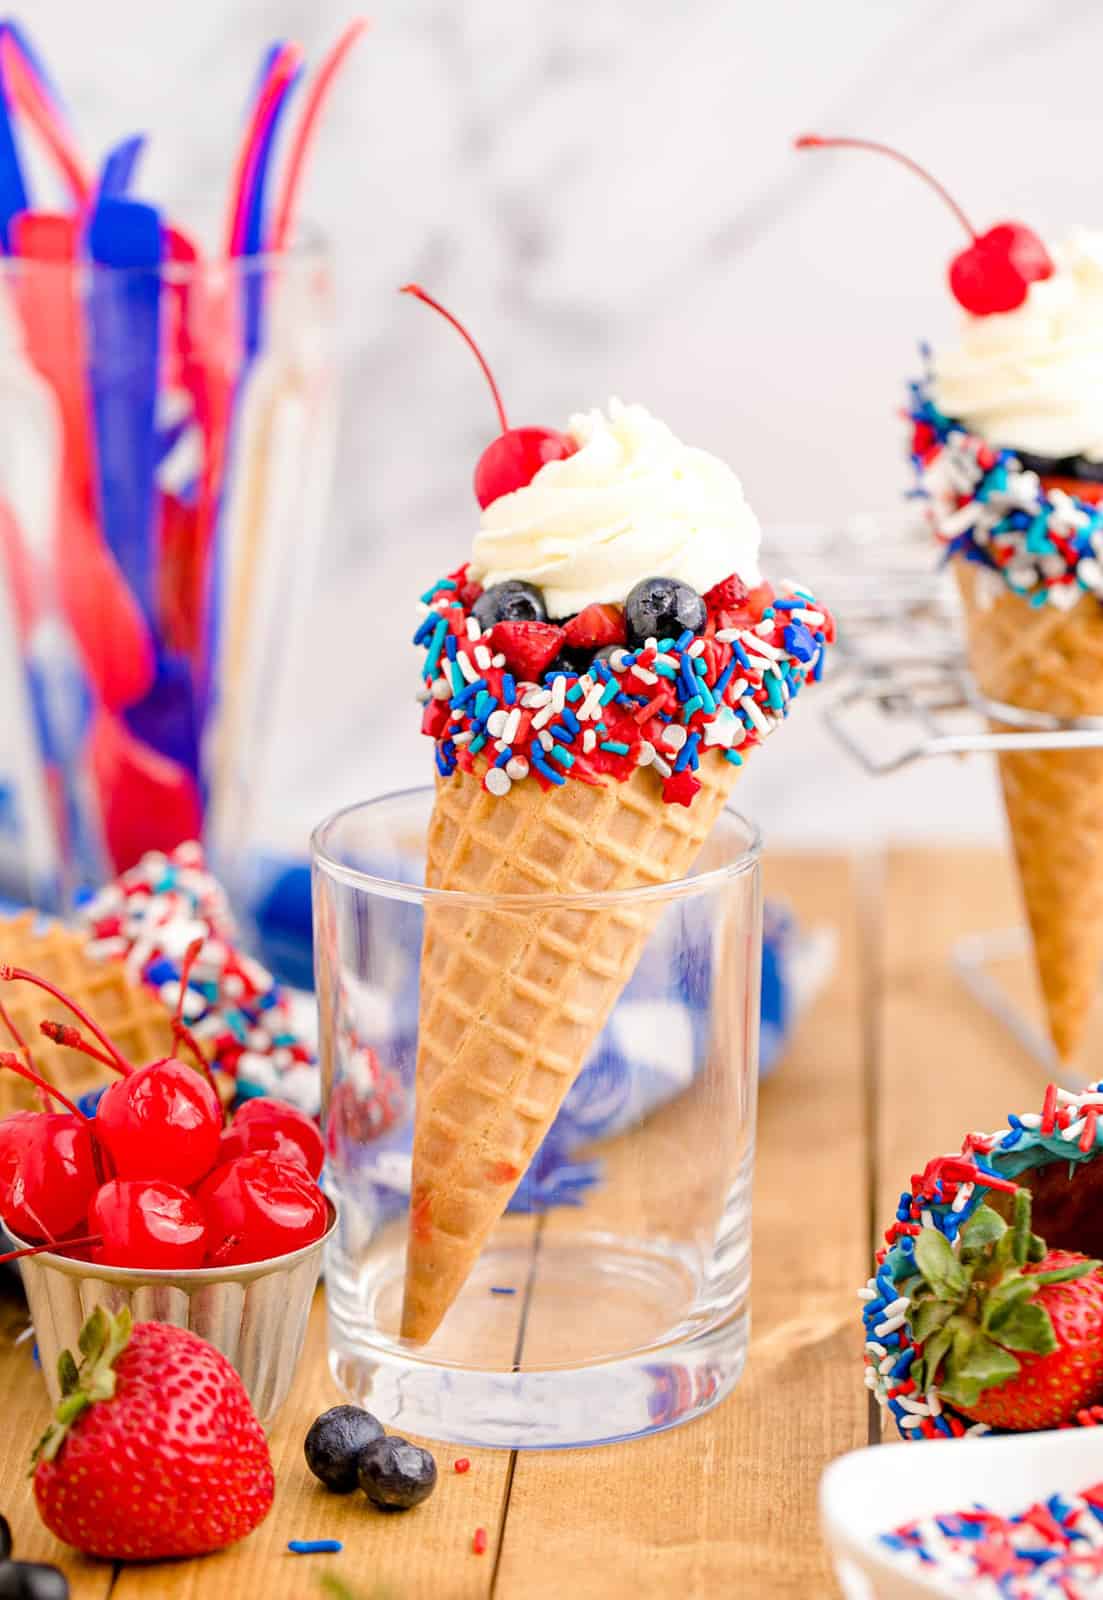
These Fruit Cones are a fun and festive dessert to make for any patriotic holiday, like Memorial Day, 4th of July, Labor, or even Flag Day. Super easy and colorful.
It’s nice to have a different type of dessert to enjoy other than your everyday brownies, cookies, or cakes. Sometimes you just want something easy and fun.
These Fruit Cones are just that, so easy! They are the perfect dessert to get the kids involved in making, just be careful with melting the chocolate candy melts.
I’ve been making these treats for years during all the summer holidays and they always get gobbled up. I mean instead of ice cream try stuffing ice cream cones with other ingredients! People absolutely love it.
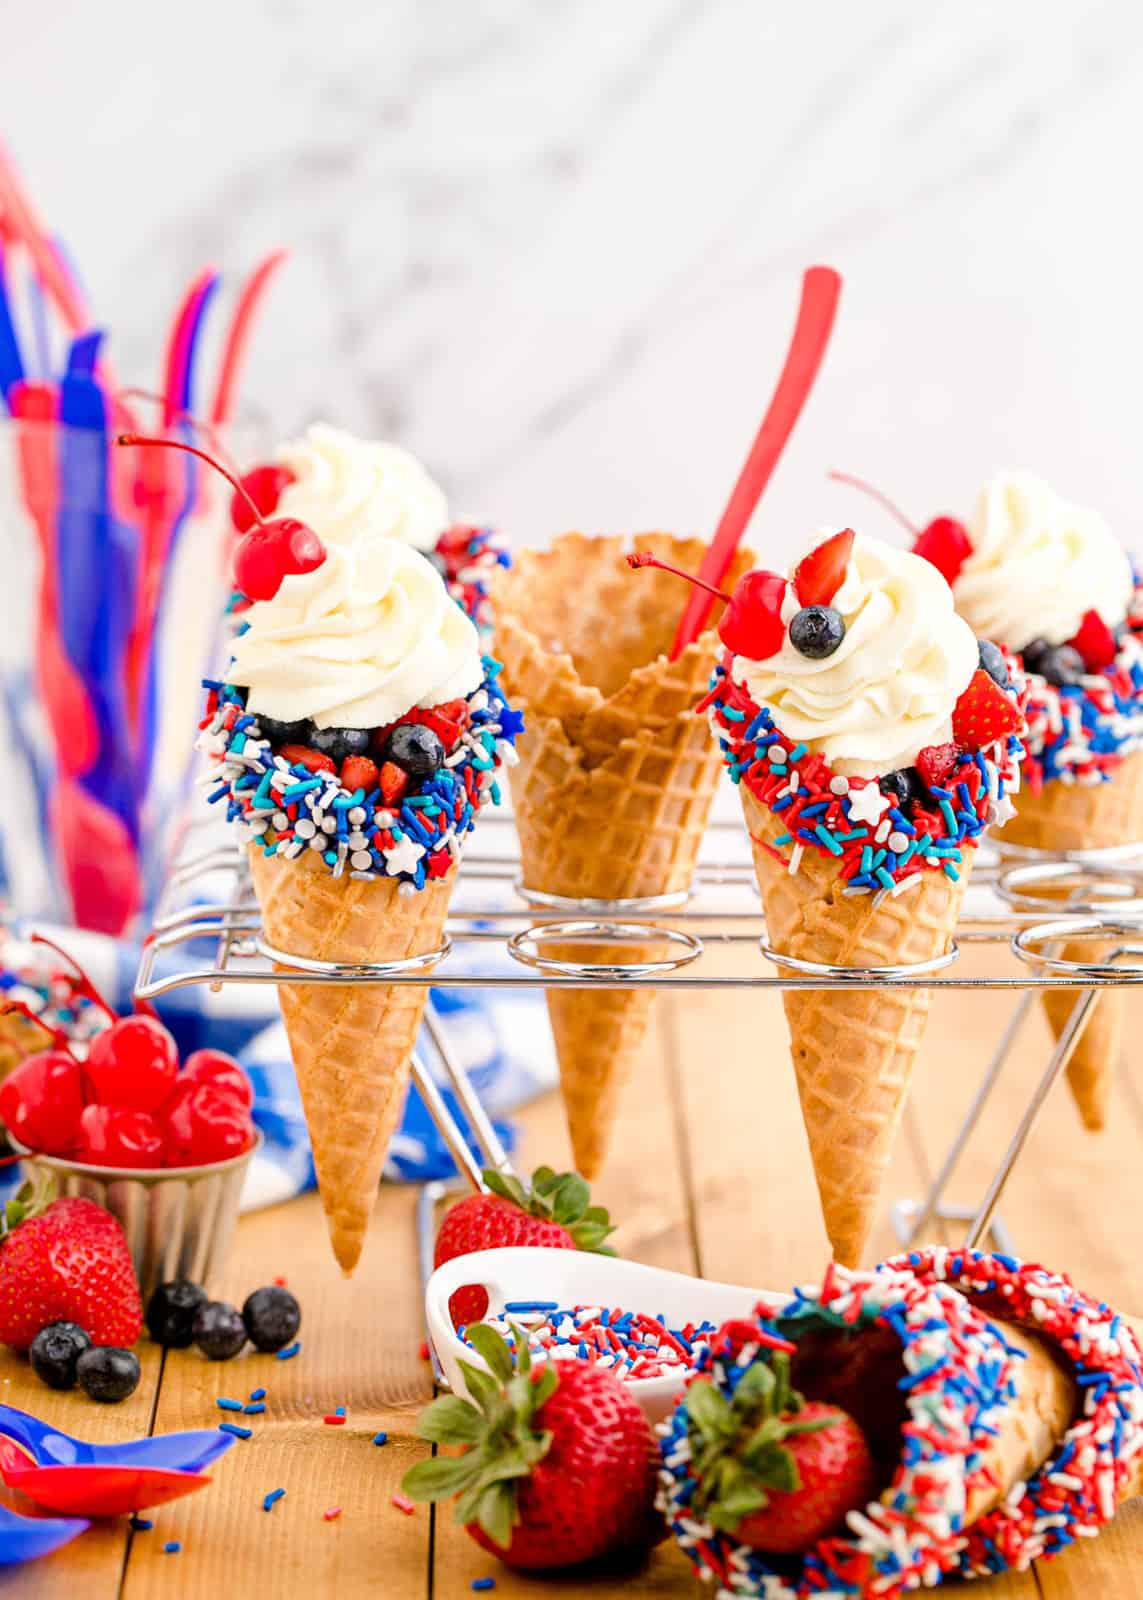
These are perfect for parties. You can make everything ahead of time and have everyone fill their Fruit Cones as they wish! We make a cheesecake flavored whipped cream, but pudding would also work.
Fill it with any of your favorite fruits and you have a fun dessert that is super tasty, easy and the kids really really enjoy. At least my kids adore these.
Some of our other favorite dessert recipes we have on our site include: Strawberry Coffee Cake, The Best Blueberry Pie, and Berry Ricotta Cake.
WHY THIS RECIPE WORKS:
- Simple yet delicious dessert that is done in less than an hour.
- You can decorate these for any holidays or just for fun using any colors or fruit you like!
- You can swap out the whipped cream filling for yogurt or pudding as well.
INGREDIENTS NEEDED (FULL RECIPE AT BOTTOM)
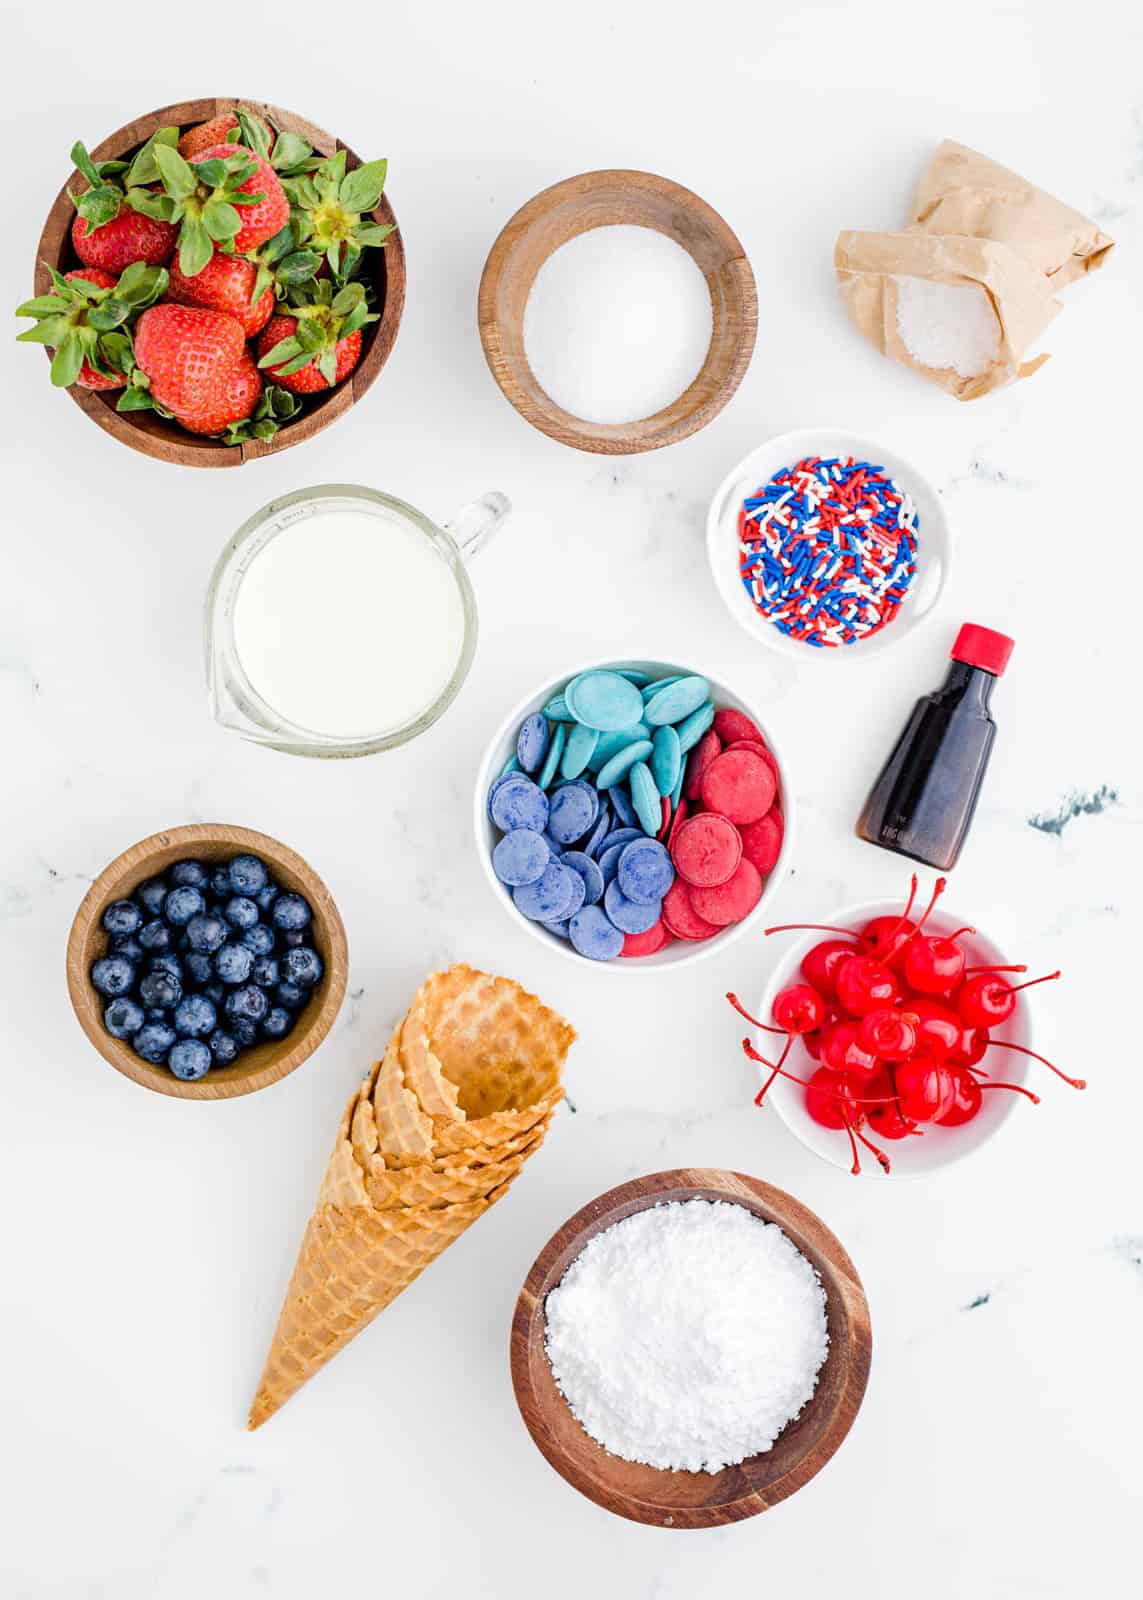
Waffle cones
Red melting chocolate
Blue melting chocolate
Strawberries
Blueberries
Granulated sugar
Heavy cream
Powdered sugar
Instant cheesecake pudding mix
Vanilla extract
Stemmed maraschino cherries
Red, white, and blue sprinkles
HOW TO MAKE FRUIT CONES, STEP BY STEP:
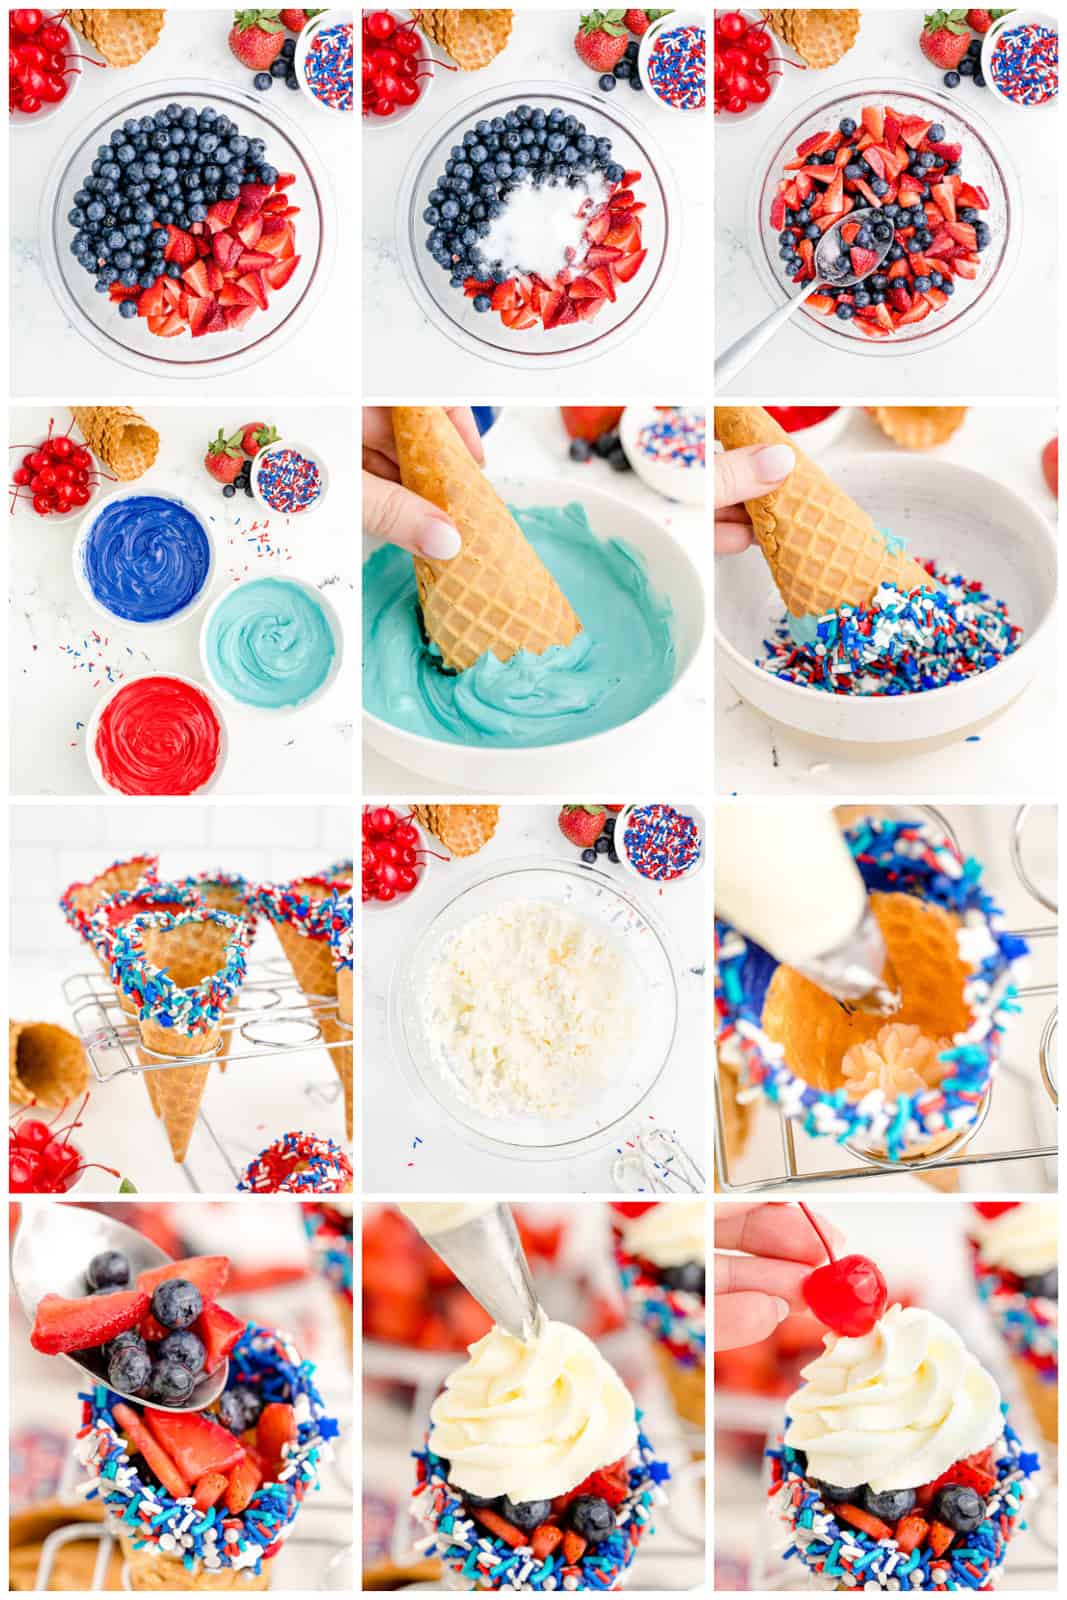
- Rinse and pat your strawberries and blueberries dry with a paper towel before slicing your strawberries.
- Add sliced strawberries and blueberries to a mixing bowl and toss with granulated sugar. Refrigerate the berry mixture while you prepare your waffle cones.
- In separate mixing bowls, microwave the red candy melts and the blue candy melts, according to the package instructions.
- After you’ve melted both the red and blue melts, dip the rims of all of the waffle cones in red and blue chocolate about 1-inch down from the top.
- Quickly, add your sprinkles immediately to the melted chocolate so it doesn’t have time to harden on the cone before decorating.
- Place the decorated waffle cones in a glass or ice cream cone holder and put them in the refrigerator to harden.
- Now make the stabilized cheesecake whipped cream by adding the cold whipped cream to a mixing bowl and beat on high for about 5 minutes or until stiff peaks start to form.
- Next, add the powdered sugar, pudding mix, and vanilla extract to the mixing bowl and continue to beat it until it’s fully combined, fluffy, and stiff.
- Put this flavored whipped cream into a piping bag and cut the tip off or use a large 1A Wilton piping tip. Pipe about an inch layer of the whipped cream into the bottom of each cone.
- Scoop about ¼ cup of berries into each cone using a slotted spoon, filling to the top and making sure to drain them well to avoid adding excess liquid to the cones.
- Add a dollop of whipped cream on top and a cherry.
- Serve these immediately or keep them in the refrigerator standing upright until you’re ready to eat them.
DO I HAVE TO ADD SUGAR TO THE FRUIT?
If you prefer not to add granulated sugar to the berries, that is just fine! You can rinse and slice them and add them to your cones without sugar for a bit of a healthier option!
The sugar added is called macerating and it draws moisture out of the fruit and creates a syrup that you can either strain or use in this recipe for a more fun fruity flavor.
CAN I MAKE THESE AHEAD OF TIME?
You can decorate the cones ahead of time and store them in the refrigerator. You can also assemble the berries and whipped cream a bit before serving, just make sure the berry juices don’t make the cones too soggy.
I’d recommend prepping the fruit and whipped cream and store in separate bowls until ready to assemble everything and enjoy.
WHAT’S THE DIFFERENCE BETWEEN A WAFFLE CONE AND SUGAR CONE?
Waffle Cones and sugar cones are both cone like in shape, but the sugar cones has a flat rim while the waffle cone rim is more uneven. The Waffle cone is made using a special waffle iron and rolled into the cone shape.
The sugar cone has a similar lattice-like pattern but it’s stronger and more sturdy than a waffle cone. Waffle cones have a sweeter taste and a higher sugar content. They’re both similar in color being a darker golden brown compared to the cake cone.
HOW TO STORE:
These are best enjoyed when freshly made. However, you can store them in the refrigerator for up to 2 days standing upright in an ice cream cone holder.
Try not to assemble if you aren’t ready to eat them and this will make storing the ingredients separately in the appropriate air-tight containers easier.
TIPS AND TRICKS:
- When dipping your cones in the colored candy melts, you only need a thin layer of candy, just enough for the sprinkles to stick to.
- Be sure to drain and pat the cherries dry with a paper towel because they usually have a lot of excess liquid and you don’t need that with the dollop of whipped cream.
- You can make these up to 2 days ahead of time, just be sure to store them properly.
- Don’t OVERHEAT the candy melts! About 30 seconds, microwaved in intervals stirring in between should get them melted properly. If you overheat, they will become clumpy and hardened.
- Use paper bowls if possible so you can just throw them when you are done with the candy melts, they are not fun or easy to clean up.
- Change out the sprinkle colors for different colors and use this Fruit Cone recipe for other holidays.
- Make sure that you are using waffle cones and not sugar cones, see above regarding the differences.
- Change up your fruit for different occasions or use any fruit for this that you’d like.

Looking for the perfect festive Fruit Cone recipe, this super easy one will be just what you need! Enjoy this colorful treat in no time, minimal ingredients and effort.
IF YOU LIKE THIS RECIPE YOU MIGHT ALSO LIKE:
If you’ve tried these FRUIT CONES or any other recipe on my site, let me know in the comment section how it turned out, we love hearing from our readers! You can also follow along with me on PINTEREST, FACEBOOK and INSTAGRAM to see more amazing recipes and what shenanigans I’m getting into!

Fruit Cones
Ingredients
- 6 waffle cones
- Red melting chocolate
- Blue melting chocolate
- 3 cups of strawberries sliced
- 3 cups of blueberries
- ¼ cup of granulated sugar
- 2 cups heavy cream cold
- ½ cup powdered sugar
- 2 tablespoons instant cheesecake pudding mix dry
- ½ teaspoon of vanilla extract
- 6 stemmed maraschino cherries
- Red white, and blue sprinkles
Instructions
- Rinse and pat your strawberries and blueberries dry with a paper towel before slicing your strawberries.
- Add sliced strawberries and blueberries to a mixing bowl and toss with granulated sugar. Refrigerate the berry mixture while you prepare your waffle cones.
- In separate mixing bowls, microwave the red candy melts and the blue candy melts, according to the package instructions.
- After you've melted both the red and blue melts, dip the rims of all of the waffle cones in red and blue chocolate about 1-inch down from the top.
- Quickly, add your sprinkles immediately to the melted chocolate so it doesn't have time to harden on the cone before decorating.
- Place the decorated waffle cones in a glass or ice cream cone holder and put them in the refrigerator to harden.
- Now make the stabilized cheesecake whipped cream by adding the cold whipped cream to a mixing bowl and beat on high for about 5 minutes or until stiff peaks start to form.
- Next, add the powdered sugar, pudding mix, and vanilla extract to the mixing bowl and continue to beat it until it's fully combined, fluffy, and stiff.
- Put this flavored whipped cream into a piping bag and cut the tip off or use a large 1A Wilton piping tip. Pipe about an inch layer of the whipped cream into the bottom of each cone.
- Scoop about ¼ cup of berries into each cone using a slotted spoon, filling to the top and making sure to drain them well to avoid adding excess liquid to the cones.
- Add a dollop of whipped cream on top and a cherry.
- Serve these immediately or keep them in the refrigerator standing upright until you're ready to eat them.
Notes
- When dipping your cones in the colored candy melts, you only need a thin layer of candy, just enough for the sprinkles to stick to.
- Be sure to drain and pat the cherries dry with a paper towel because they usually have a lot of excess liquid and you don't need that with the dollop of whipped cream.
- You can make these up to 2 days ahead of time, just be sure to store them properly.
- Don’t OVERHEAT the candy melts! About 30 seconds, microwaved in intervals stirring in between should get them melted properly. If you overheat, they will become clumpy and hardened.
- Use paper bowls if possible so you can just throw them when you are done with the candy melts, they are not fun or easy to clean up.
- Change out the sprinkle colors for different colors and use this Fruit Cone recipe for other holidays.
- Make sure that you are using waffle cones and not sugar cones, see above regarding the differences.
- Change up your fruit for different occasions or use any fruit for this that you'd like.
Nutrition
Tornadough Alli is not a nutritionist or dietitian, and any nutritional information shared is an estimate. If calorie count and nutritional value is important to you, we recommend running the ingredients through whichever online nutritional calculator you prefer. Calories and values can vary depending on which brands were used.
Leave a Reply